Lucid Nightmare is a secret mount obtained by solving a complex series of puzzles from the Mind-Seekers, Azeroth's enigmatic riddle-makers. Lucid Nightmare is one of the major secrets added in Legion, along with Kosumoth the Hungering, Riddler's Mind-Worm, Sun Darter Hatchling and Uuna.
Important: Make sure to read each Inconspicuous Note before heading to the next puzzle.
Use this script to track your progress:
/run local N,t,d={"DAL","ULD","AQ","DEEP","GNOMER","VAL","MAZE","MOUNT"},{47826,47837,47841,47850,47852,47863,47881,47885} for s,k in pairs(N)do d=C_QuestLog.IsQuestFlaggedCompleted(t[s]) print(k,"=",d and "\124cFF00FF00" or "\124cFFFF0000NOT","DONE")end
Note #1: Secrets of Ulduar
It begins in the 2104059.

With a most pleasing sign.

(These letters will not always rhyme.)
The first note is found on a table at the top level of Curiosities & Moore in Dalaran.
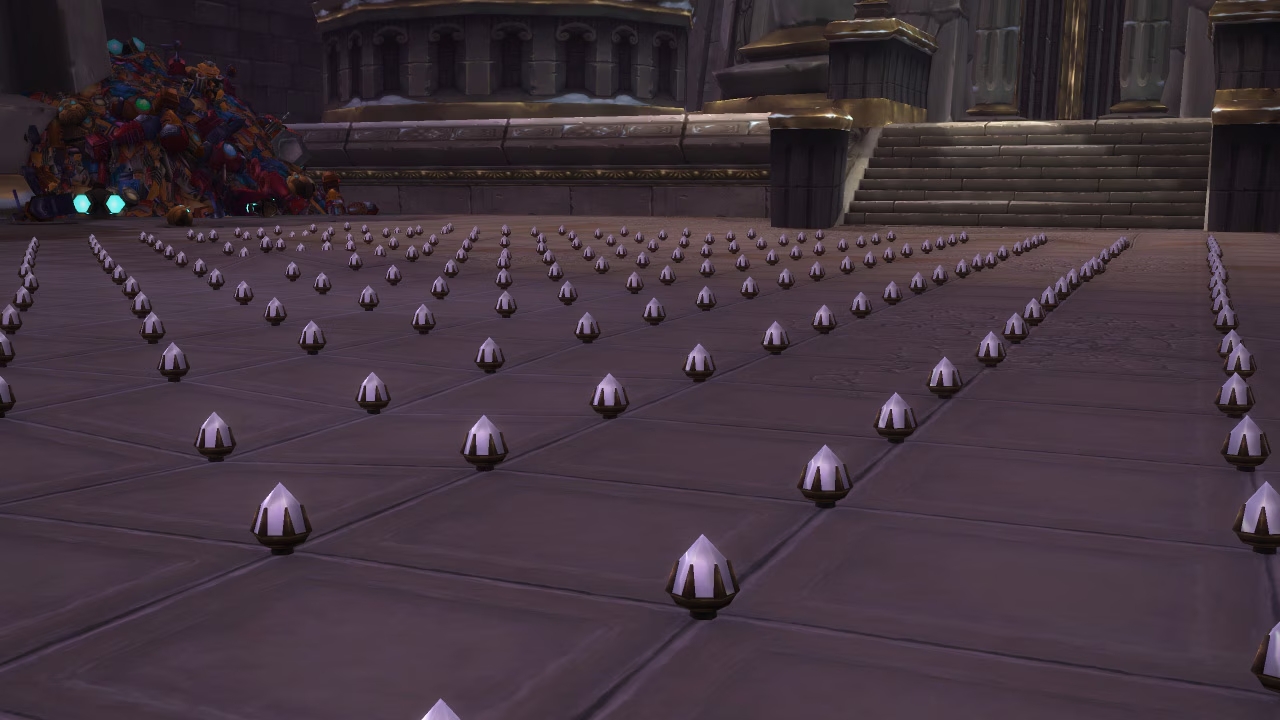
Solution: Go to Ulduar and find the Rusty Lever and in the North-West corner of the Scrapyard. Click the lever, and a 20 by 20 grid of Scrapyard Lights will appear on the floor of the room. Click the lights to form the pattern below and then the Inconspicuous Note will appear.
Spoiler
The Mind-Seekers seem to have a penchant for leaving their notes in obvious places. Maybe they want us to find their treasures? Maybe they feed on our thoughts? That's probably not important...
What was important was an Inconspicuous Note, sitting on a table in the Curiosities & Moore shop in Dalaran (Broken Isles):
It begins in the 2104059.
With a most pleasing sign.
(These letters will not always rhyme.)
2104059, of course, is an anagram of 2009-04-15, the date of the Ulduar patch notes on the official World of Warcraft site. From there, players combed Ulduar for clues. Observant players discovered a new lever in the XT-002's room that they could interact with among the piles of scrap. Pulling this lever summons a massive 20x20 grid of Scrapyard Lights on the floor of the room. Interacting with these lights toggles them on and off.
In the Inconspicuous Note, the Mind-Seekers requested a "most pleasing sign." Many signs and symbols appear in Ulduar, the most prominent being the four symbols of the keepers of Ulduar. Of the four symbols, the most pleasing to the Mind-Seekers is evidently that of Mimiron: a gear. Players needed to draw this symbol of ingenuity with the lights in order to progress.
Observant players also noted that, of the four symbols, only the gear is symmetrical across both axis. As the Mind-Seekers never specified which direction was "up" on the lights puzzle, it was a good guess to assume it needed symmetry. Well done! - Developer note
"A gear, the symbol of Mimiron, the most intellectual keeper." - Muffinus
Note #2: Mindcraft
1000 years imprisoned.
Surely it wears on the mind.
Head to AQ40 and make your way to the end of the raid. Go past C'thun, past the 3 NPCs, and at the top of the stairway there will be an altar with a Mind Larva on it. Click it to start Mindcraft, a minigame similar to JewelCraft.
Solution: Match five brains in a row to win. Note that even though Blizzard's article suggests that matching five brains is the only way to win the game, multiple people have confirmed winning the game after playing for a while (anywhere from 10 to 30 minutes), possibly by reaching a certain number of hidden points.
Spoiler
1000 years imprisoned.

Surely it weighs on the mind.
This clue refers to the three dragons imprisoned with C’thun in the Temple of Ahn’Qiraj. Simply head to AQ40 and make your way to the end of the dungeon where C’thun resides.
There was no way we weren’t doing something in AQ40, and we’ve always wanted to use that space behind the dragons! - Developer note
Just before C’thun is a side path to the dragons. Behind them, at the top of a stairway, you’ll find an altar with a Mind Larva on it.
Interact with the Mind Larva to insert it into your brain, presenting you with a Jewelcraft-like match three minigame that will project in front of you (and anywhere you look). The key to winning the game, of course, is brains: match five brains in a row to win!
We wanted to put in an easier, more fun puzzle to give your brains a rest. What we didn’t count on was the win condition on this puzzle bring one of the most hotly-debated things in the Secrets Discord channel, even after players had long progressed past it! - Developer Note
Note #3: The Chair
Deeper than deep.

Awaits your seat.
Before going further, you'll need to get a Shadoweave Mask. You can buy it from the Auction House or craft it yourself if you have Tailoring and the Pattern: Shadoweave Mask. If you don't have the pattern, you can get it from Dark Iron Steamsmith in Searing Gorge.
Solution: Go to Deepholm, enter the Crumbling Depths and interact with the Dark Fissure.
A fissure in the ground, barely wide enough to squeeze through. It's too dark to see anything, but you can tell that it is very deep.
> Drop into the fissure.
WARNING: You are about to fall into a dark fissure. You may not be able to climb back out again. Are you very sure you want to do this?
Accept the warning! You have now fallen into a Deep Cavern. Find the chair with the Dingy Plaque behind it.
The plaque is old and barely legible. You can only make out fragments of each line of text.

Supremacy?

Get...

Shirk...

...eke...
Solution: Equip the Shadoweave Mask, interact with the Strange Skull on the chair and a new note will appear.
Spoiler
Deeper than deep.
Awaits your seat.
In the deepest cavern of Deepholm, is a deep fissure to an even deeper place: the Deep Chasm. It won’t look like much at first, but mind your step—you won’t be defying gravity here.
A lonely seat awaits you there, but it’s not just any seat; it’s a chair of insanity!
This was, by far, one of the most fun and meme-filled portions of the search to watch. Well, we had a lot of fun at least! - Developer note
Sitting on that chair is a strange skull. On the back of the chair is a plaque that reads:
The plaque is old and barely legible. You can only make out fragments of each line of text.
Supremacy?
Get...
Shirk...
...eke...
The Secret-Finding community, while nimble with previous riddles, was unable to crack this one for over 48 hours, and with good reason. Not only was the text misleading, but it was also localized completely different in various languages. For example, when English talked of Supremacy, German mentioned of Blackmail, and Traditional Chinese referenced Forests. This made many potential solutions invalid or nonsensical.
In fact, the translation was different because the meaning of the words didn’t matter. The meaning of the word, line breaks and punctuation, and the idea that it was a partial text and that there were blanks to be filled in, were all red herrings. Only the letters mattered, which then formed an anagram.
Developer Note: It was amazing to see the international community come together to break the first part of the riddle. Players in various languages realized that they could extract “is the key” from their text and they would be left over with a set of nonsense letters that was the same in multiple languages. They knew they were on to something!
When “Is the key” is removed, the remaining letters were commonly similar in different languages. In English, they spelled RACKSUM GREEP. A bizarre sounding string of letters, which is actually the name of a new goblin NPC that was added to Ratchet in Patch 7.3.
Players attempting to search for the name on the internet bizarrely found themselves on a WoWhead page for the original version of the Greench, the creature that was altered to create Racksum Greep while keeping his identity a secret. What they did know was that something had changed, and they were hot on the trail of the solution. - Developer note
RACKSUM GREEP IS THE KEY, or rather specifically, his outfit. He is wearing a rather obscure set of clothing, all low-level tailored gear in various bright colors. To solve this puzzle, players would have to present the skull in the cavern with the only adornment fit for it: Racksum Greep’s mask.
The Shadoweave Mask was once obtained from a quest chain that began in Searing Gorge, but that area has long since been taken over by Dark Iron Steamsmiths, who now drop the Tailoring pattern for it. (You’ll want to put on the mask before entering the fissure). Talking to the Strange Skull while wearing the Shadoweave Mask sounds crazy on paper, but it also summons the next note.
Note #4: It's Binary?
Where the shaded delegate may appear.
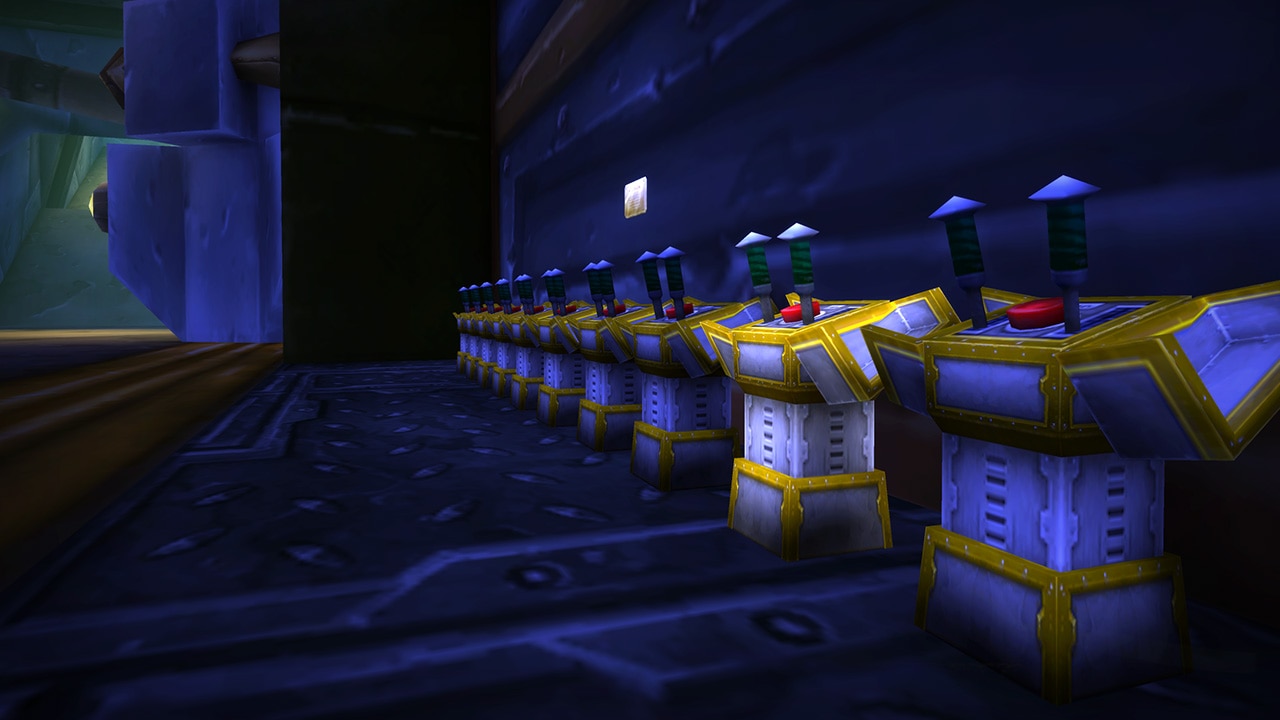
Enter Gnomeregan and go to the Engineering Labs where you'll find a wall with 10 Numeric Consoles and a plaque with instructions.
The ‘shaded delegate’ refers to the Dark Iron Ambassador, a rare spawn that sometimes appears in the Gnomeregan dungeon. Deep within the grinding, gear-filled city, you’ll find a wall with a series of 10 Numeric Consoles, which allow you to enter a digit from 1 to 9. Above these consoles is an Instructions plaque, which reads:
A puzzle in binary? Not so simple. The binary was another red herring, and a very effective one at that. This puzzle also stumped players for over 48 hours, though it didn’t quite hit the insanity level of The Chair.
Here is the solution to the English version of this puzzle (which also works for all other languages, except for Traditional Chinese, which we’ll get to in a moment):
The binary is in sets of 8, 5, and 24 digits. 8s and 5s always appear as a pair.
For each 8-5 pair, take the sums of the digits in each side, and multiply them together.
Ex: 10010110 10101 = 4 and 3, and 4 x 3 = 12.
For each 24-digit entry, sum up the digits directly.
Ex: 011010111001011010010110 = 13.
That gives you the sequence 6 12 14 7 13 18 12 3 13 20 25 3 8 18 7 25 2 13.
Put that through a basic Caesar cipher (A=1, B=2, C=3, etc…): F L N G M R L C M T Y C H R G Y B M
That gives you abbreviated versions of three pet battle abilities found on Murloc pets: Falling Murloc, Mighty Charge, and Eye Beam.
At max level, these abilities do a total of 684, 560, and 1110 damage, giving us our code, 6845601110.
The ‘180’ near the end of the instructions tells you to flip it around (as in 180 degrees): 0111065486.
And lastly, +1111111111 is simple addition: 1222176597.
Putting 1222176597 into the Numeric Consoles will complete this puzzle.
The localization team was put to the test with this puzzle, as the solution doesn’t work in Traditional and Simplified Chinese. Both localization teams did a great job of coming up with their own puzzle, and the puzzle was first solved in Traditional Chinese! Enterprising players eventually worked the puzzle solution out in non-Chinese languages by working backward from the known solution! - Developer note
Traditional Chinese is not an alphabetic but an idiographic language, here is the solution:
Each is not really a value but the quantity of the binary code 0 and 1.
Ex: the first number ‘2’ means 2 zeros and the second ‘3’ means 3 ones, and in this way, 23211 can be converted to 001110010.
Convert the binary code gained to hex.
Convert the hex to ASCII code.
Convert the ASCII codes to the Traditional Chinese characters.
The result is the three localized battle pet ability names:
Falling Murloc 魚人墜落擊
Mighty Charge 全力衝鋒
Eye Beam 魔眼光束
Simplified Chinese uses Pinyin to Romanize the Chinese characters into letters. The pet battle abilities, 天降鱼人 强力冲锋 眼棱, become Tianjiangyuren Qianglichongfeng Yanleng. Similar to the English solution, we then removed the vowels and converted the remaining letters into fake binary.
With the correct numbers entered, all the consoles close up and the next note appears.
Note #5: Nightmare Tumor
Games and toys are left behind.

When you awaken screaming.
Solution: Go to Val'sharah, find the Nightmare Tumor and play the Eyecraft minigame where you'll have to uncross the optic nerves of Il'gynoth's many eyeballs. This minigame is similar to Blingtron's Circuit Design Tutorial.
Il'gynoth will whisper to you "AL'KSH SYQ IIR AWAN? IILTH SYTHN AQEV." which translates to "Is this real or an illusion? You are going mad."
/way Val'sharah 66.4 36.5
Spoiler
Games and toys are left behind.
When you awaken screaming.
This clue directs you to the Emerald Nightmare-affected areas of Val’sharah, where the Night Elves living there were driven from their homes by the Nightmare. In one particular home in Ash’theran, you’ll find a minigame, similar to the Blingtron's Circuit Design Tutorial minigame, which has been corrupted by Il’gynoth. The goal of the minigame is to uncross all Il’gynoth’s optic nerves by clicking on his eyeballs to swap them.
Meanwhile, Il’gynoth is reminding you that you are going “mad, mad, mad…”
Note #6: The Endless Halls
What you seek is buried within.
Solution: Head to the Tomb of Secrets in Kun-Lai Summit and interact with the urn to enter the Endless Halls maze.
The Endless Halls is a cruel, uncompromising maze, designed to confuse and disorient at every turn. You start in a nondescript room with foggy exits in the four cardinal directions (N/E/S/W), though some are blocked by rubble. Going in one of these exits will fade the screen to black, then fade back in with you in the connected room.
The goal of the maze is to find 5 colors of orbs (red/blue/green/yellow/purple), and deliver them (carried one at a time) to the 5 matching colors of runes. However, several mechanics make this much more difficult than it may sound.
The maze is arranged on an 8x8 grid of rooms. Each cell has between one and four exits. However, if it would have 4 exits, it’s actually not a single room, but two two-way rooms that occupy the same space, but don’t intersect. These Non-Intersecting Cross rooms are the first major source of confusing discontinuity, and also cannot contain any Orbs or Runes.
The second main source of disorientation is the edges. They loop around, but not directly. Instead, exiting one end of the maze will send you to the other side of the maze, with an additional offset. This makes it very difficult to tell what room you will end up in if you cross the edge of the map. You can, however, reliably backtrack from your new position to your previous position. Many players made frequent use of this backtracking to reliably navigate the maze without getting lost.
In addition, there is one final wrench thrown into the gears: the Teleportation Trap. Within the maze, a single room is the Teleportation Trap. When you enter this room, you are instead secretly teleported to a random room in the maze. Once you’ve identified the Teleportation Trap room, avoid it at all costs!
Once you’ve dropped the fifth orb off at its matching rune, the next exit you travel through will takes you to a golden room with the next Inconspicuous Note.
Solution: One of the easiest ways to complete this puzzle is to keep moving in the same direction, always turning left or always turning right. Pick up an orb and carry it until you find the matching colored rune. This method works because you will eventually enter the Teleportation Trap room, which sends you to a random location and helps you reach new parts of the maze.
Once you've dropped the fifth orb off at its matching rune, the next exit you travel through will take you to a golden room with the next Inconspicuous Note.
Alternative: If you need help navigating the Endless Halls, consider using the addon Lucid Nightmare Helper (make sure you add ## Interface: 120000 in the .toc addon file so it works for Midnight). The addon automatically maps the rooms as you explore, allowing you to track your path and mark locations with orbs or runes.
After discovering a special room (with an orb or rune), continue mapping until you find another one, then return to the previous room to confirm you didn't trigger the Teleportation Trap. Repeat this process until you have mapped all the required rooms.
Note #7: The Forgotten Crypt
The way is now open.
To the greatest secret never told.
A fitting end to your journey.
The clue here is a reference to a place in the world that has long been a secret to those in the know, but has never been used—the horrendously creepy Forgotten Crypts in Karazhan. In the game since the WoW’s initial launch, exploration-focused players ventured into these crypts for years after each patch, in the hopes of finding some newly-added secret. They were perpetually disappointed—until now.
This time, sitting on top of a pile of bones near the bottom of this huge-but-empty crypt (within The Pit of Criminals) is a chest containing the Lucid Nightmare.


 Originally Posted by Blizzard (Source)


